Share

Basics of HTML
If you are new to learn HTML then I would like to suggest you to visit my Basic Overview of HTML page first, because it contains the preliminary knowledge of HTML which  you need to continue with my HTML tutorial and for better understanding.


INDEX: Paragraph_Writing | Text_Formating | Headings_Styling | Attributes | Images | Links | Lists | Tables | Forms | HTML_Colors


Paragraph Writing


To write or create a paragraph you have use tag <p> with its opening tag and closing tag, and the paragraph should be between the <body></body> tag. For example-

<html>
<head><title>The first page</title>
</head>
<body>
<p>This is my first paragraph</p>
<p>This is my second paragraph</p>
</body>
</html>

The result should be like this-
Result

If you want to give break in single line of text in a paragraph then you have to use the tag <br/>. Use this <br/> tag to give break between lines. For example-

<html>
<head><title>The first page</title>
</head>
<body>
<p>This is my first paragraph</p>
<p>This is my second paragraph</p>
<p>This is <br/>a break of line</p>
</body>
</html>

Result:
Result

Formatting Text


Now we came to the very important part. This part is all about text styling. So bare with me, write the codes as shown below and check-

</head>
<body>
<p>This is my paragraph</p>
<p><b>This is bold text</b></p>
<p><i>This is italic text</i></p>
<p><big>This is big text</big></p>
<p><small>This is small text</small></p>
<p><strong>This is strong text</strong></p>
<p><inserted>This is inserted text</inserted></p>
<p><sup>This is superscripted text</sup></p>
<p><sub>This is subscripted text</sub></p>
<p><del>This is deleted text</del></p>
</body>
</html>

The result will be-
Result

Heading Styles


According to the importance HTML possess six levels of headings. They are-

<html>
<head><title>The first page</title>
</head>
<body>
<h1>Heading one</h1>
<h2>Heading two</h2>
<h3>Heading three</h3>
<h4>Heading four</h4>
<h5>Heading five</h5>   
<h6>Heading six</h6>
</body>
</html>

Result:
Result

Line Creation

Use <hr/> tag to create a horizontal line in the page.

<html>
<head><title>The first page</title>
</head>
<body>
<p>This is first paragraph</p>
<hr/>
<p>This is second paragraph</p>
</body>
</html>

The result:
Result

Include Comments Between Codes

It is necessary to write comments between the codes to let the second person understand your codes. Browser won't display this comment. So, to write this comment use the following method-
<!--This is your comment-->

For example-

<html>
<head><title>The first page</title>
</head>
<body>
<!--This is a comment-->
<p>This is first paragraph</p>
<hr/>
<p>This is second paragraph</p>
</body>
</html>

HTML Attributes


Additional information are provided by attributes to the function to get modified. The attribute sits in the opening tag to direct the line of code how it should get modified. For example if we want to bring a line at the center of the page then we should use align attribute and value as center.

<p align="center">This line is aligned to center</p>

Result:
Result

Now come to the attributes of measurements part. If you want to modify the pixels of a line then use the attribute as width and value as px or %.

<hr width="80px"/>
<hr width="80%"/>

For example:

<html>
<head><title>The first page</title>
</head>
<body>
<p>This is first paragraph</p>
<hr width="80px"/>
<p>This is second paragraph</p>
</body>
</html>

You can place multiple attributes in the same element like-

<html>
<head><title>The first page</title>
</head>
<body>
<p align="center">This is first paragraph<hr width="80px"/></p>
</body>
</html>

Result:
Result

Insert Image


For inserting an image you have to use <img> tag. Here you have to use src attribute which is used to define the image url, and you also have to have alt value of that image.

<img src="image url" alt="The image name"/>

For example:

<html>
<head><title>The first page</title>
</head>
<body>
<img src="http://example.com/facebookicon.png" alt="Facebook icon"/>
</body>
</html>

You can also specify the height and width of the image using the attributes height and width. Such as-

<img src="image url" height="250px" width="100px" alt="The image name"/>

There is a option to give border around the image by using the attribute border.

<img src="image url" height="250px" width="100px" border="1px black" alt="The image name"/>

Insert Links


Links are defined in HTML by <a> tag. Inside the opening <a> tag you have to insert href attribute to define the specific link. There is another attribute which is target, this attribute specifies whether the link open in new window or current window. If you want to open the link in new window then use _blank value. Example-

<a href="https://mluin.blogspot.com" target="_blank">MLuin's Tech Knowledge</a>

Insert List


If you want to order your list then you have to use the tag <ol> and for each list item use the <li> tag. Example-

<html>
<head><title>The first page</title>
</head>
<body>
<ol>
<li>Sunday</li>
<li>Monday</li>
<li>Tuesday</li>
</ol>
</body>
</html>

Result:
Result

Now if you want to create an unordered list then you have to use the <ul></ul> tag instead of  <ol></ol> tag. 

Result:
Result

Table Creation


Tables are defined by the tag <table>. There should be row and column in the table. So the row is defined by the tag <tr> and the column is defined by the tag <td>. Example-

<body>
<table>
<tr>
<td>Black</td>
<td>Yellow</td>
<td>Green</td>
</tr>
</table>
</body>

Now to give border in the table use the tag attribute border. Example-

<table border="2">
<tr>
<td>Black</td>
<td>Yellow</td>
<td>Green</td>
</tr>
</table>

Result:
Result

If you want to color your boxes then use the attribute bgcolor. Example-
<table border="2">
<tr>
<td bgcolor="silver">Black</td>
<td bgcolor="yellow">Yellow</td>
<td bgcolor="green">Green</td>
</tr>
</table>

Result:
Result

Create Form


Usually forms are used to collect the user information. So to create a form you have to use <form> tag. At the same time use action attribute to point to the web page that will load after they submit the form. Example-

<body>
<from action="https://mluin.blogspot.com"></form>
</body>

There are two important attribute called method and name in the form. The attribute method has two types of value, one is GET which means when form is submitted the data will be visible and another one is POST which is used to make the data invisible after submission for any security purpose. Example-

<form action="url" method="GET">
<form action="url" method="POST">

Inside the form there should be filde for Name and Password. So to include them use <input> element and use type and name as attribute. For example-

<body>
<form>
<input type="text" name="username"/>Name
<br/>
<input type="password" name="password"/>Password
</form>
</body>

Result:
Result

If you want to allow your users to choice only one value then you can change your input type to radio. Example-

<form>
<input type="radio" name="gender" value="male"/>Male
<br/>
<input type="radio" name="gender" value="female"/>Female
</form>

Result:
Result

You can use checkbox instead of radio for allowing user to select more than one option. Example-
<form>
<input type="checkbox" name="gender" value="1"/>Male
<br/>
<input type="checkbox" name="gender" value="2"/>Female
</form>

Result:
Result

Now your form is ready to submit. Create a submit button like below-

<input type="submit"  value="Submit"/>

Result:
Result

HTML Colors


Hexadecimal values are used to express HTML colors. There are 16 values 0 to F where  0 represents the lowest value and F represents highest.
0,1,2,3,4,5,6,7,8,9,A,B,C,D,E,F
Colors are displayed in combination of RGB ie, red, green and blue. Hashtag symbol(#) is used to write hex values.There are almost 16 million combinations of RGB. 
Basic overview of HTML

What is HTML?

The full form of HTML is Hyper Text Markup Language. Markup language doesn't need any script to perform function it uses tags for identifying any content. For example- <p>I am a sentence</p>. Here '<p>' is opening tag and '</p>' is closing tag.

The <html> Tag

There are several versions of  HTML but the basics are same. The opening tag is <html> and the closing tag is </html>. Example-
<html>
----------
</html>

The <head> Tag

Your document should posses a head portion which contains some non visible element that helps the page to work. To set head in your document write like this-
<html>
<head>..</head>
</html>

The <body> Tag

There is no document possible without body. So, to define body you should write like this-
<html>
<head>..</head>
<body>..</body>
</html>

Create Your HTML Page

You can use any kinds of notepad to write HTML as they are simple text files, but I prefer code editor notepad like Notepad++ as they help you to organize your codes very easily. Open your notepad and write the following things-

<html>
<head></head>
<body>This is my first text line</body>
</html>

Now save the file as .htm or .html file format. Example- Newpage.html 
Then open the file in a web browser. You should see your page like this-
First html page

Use <title> Tag

You should have a title in your page. So, add title by following manner-

<html>
<head><title>The first page</title>
</head>
<body>This is my first text line</body>
</html>

This will give you the following result-
HTML page with title
Congratulation! You have learnt how to create a basic HTML page. For advanced learning click h e r e .
HTML5


  1. <html> 
  2. <!DOCTYPE HTML> 
  3. <head> 
  4. <title>Mohammad Luin</title> 
  5. </head>
  6. <body bgcolor="#FFFFFF"> 

  7. <h1><font color="#000099">Heading one with color Blue</font></h1>
  8. <h2>Heading two</h2>
  9. <h3>Heading three</h3>
  10. <h4>Heading four</h4>
  11. <h5>Heading five</h5>   
  12. <h6>Heading six</h6>

  13. <hr width="700px"/>

  14. <!--Writing article with a Heading and Section including Aside text-->
  15. <article>
  16. <h3 align="center">WELCOME!</h3><br/>
  17. <section>
  18. <h4 align="center">This is a section Head</h4><br/>
  19. <p align="center">The is a test article for the test Heading</p><br/>
  20. </section>
  21. <aside>
  22. <p>This is a aside text</p>
  23. </aside>
  24. </article>

  25. <!--Ordering list-->
  26. <ol>
  27. <li>Black</li>
  28. <li>Blue</li>
  29. <li>Green</li>
  30. </ol>

  31. <!--UnOrdering list-->
  32. <ul>
  33. <li>Black</li>
  34. <li>Blue</li>
  35. <li>Green</li>
  36. </ul>

  37. <p align="center">This text is aligned to center<br/><hr width="100%" align="center"/></p>

  38. <!--Different Text Format-->
  39. <p><b>This is a bold text example</b></p>
  40. <p><big>This is a big text example</big></p>
  41. <p><i>This is an italic text example</i></p>
  42. <p><small> This is a small text example</small></p>
  43. <p><sub>This is a subscripted text example</sub></p>
  44. <p><sup>This is a superscripted text example</sup></p>
  45. <p><ins>This is an intserted text example</ins></p>
  46. <p><del>This is a deleted text example</del></p>

  47. <!--Image Inserting Process-->
  48. <img src="neg_fox.jpg" hight="100px" width="100px" border="1px black" alt=""/>
  49. <img src="image.svg" alt="" hight="300"><br/>
  50. <svg width="2000" hight="2000">
  51. <circle cx="80" cy"80" r="50" fill="green"/>
  52. <rect width="300" hight="100" x="20" y="20" fill="yellow"/>
  53. </svg><br/>
  54. <svg width="500" hight="500">
  55. <path d="M0 0 L0 100 L100 100 L100 0 Z"/>
  56. </svg>

  57. <!--Link Inserting Option-->
  58. <a href="http://mluin.blogspot.com" target="_blank">mLuin's Tech Knowledge</a>

  59. <!--Table creation-->
  60. <table align="center" border="3">
  61. <tr>
  62. <td bgcolor="red">RED</td>
  63. <td bgcolor="yellow">YELLOW</td>
  64. <td bgcolor="green">GREEN</td>
  65. </tr>
  66. <tr>
  67. <td>Stop</td>
  68. <td colspan="2">Wait & Go</td>
  69. </tr>
  70. </table>

  71. <!--Form Creation-->
  72. <form>
  73. <lable>Your name</lable>
  74. <input id="user" name="username" type="text"/>
  75. </form><br/>

  76. <!--Hint-->
  77. <form>
  78. <lable for="email">Your email address</lable>
  79. <input type="text" name="email" placeholder="example@gmail.com"/>
  80. </form><br/>

  81. <!--Autofocus-->
  82. <form>
  83. <lable for="email">Your email address</lable>
  84. <input type="text" name="email" autofocus/>
  85. </form><br/>

  86. <!--Sample form-->
  87. <form autocomplete="off">
  88. <lable for="email">Your email address:</lable>
  89. <input name="Email" type="text" required/>
  90. <input type="submit" value="Submit"/>
  91. </form>

  92. <form action="http://mluin.blogspot.com" method="GET/POST">
  93. <!--Input type 1(General Password)-->
  94. <input type="text" name="username"/>Username<br/>
  95. <input type="password" name="password"/>Password<br/>

  96. <!--Input type 2(Radio)-->
  97. <input type="radio" name="gender" value="male"/>Male<br/>
  98. <input type="radio" name="gender" value="female"/>Female<br/>

  99. <!--Input type 3(Check box)-->
  100. <input type="checkbox" name="gender" value="1"/>Male<br/>
  101. <input type="checkbox" name="gender" value="2"/>Female<br/>

  102. <!--Submit option-->
  103. <input type="submit" value="Submit"/>
  104. </form>

  105. <!--Audio file insert-->
  106. <audio src="image.mp3" controls>
  107. Your browser doesnt support audio files
  108. </audio>
  109. <audio controls autoplay loop>
  110. <source src="audio.mp3" type="audio/mpeg">
  111. <source src="audio.ogg" type="audio/ogg">
  112. Audio elements not supported by your browser
  113. </audio><br/>

  114. <!--Video file insert-->
  115. <video controls autoplay loop>
  116. <source src="video.mp4" type="video/mpeg">
  117. <source src="video.ogg" type="video/ogg">
  118. Audio elements not supported by your browser
  119. </video>

  120. <br/>

  121. <!--Inserting Progress bar-->
  122. <progress min="0" max="100" value="35"></progress><br/>

  123. <!--Insert Search Box-->
  124. <input id="mysearch" name="searchitem" type="search"/><br/>

  125. <!--Options In Search Box-->
  126. <form>
  127. <input id="car" type="text" list="colors"/>
  128. <datalist id="colors">
  129. <option value="RED">
  130. <option value="YELLOW">
  131. <option value="GREEN">
  132. </datalist>
  133. </form></br>

  134. <svg width="100" hight="100">
  135. <line x1="50" y1="0" x2=>


  136. </body>
  137. </html>

Notice:
To see the effect or meaning of each line of these codes copy codes from 1 to 164 and paste it in a notepad and save the file as .html file, then open the file in your browser.

Add Sitemap to Blogger
The Sitemap XML file is just like a directory of your blog's pages. As you know your blog is always getting crawled by search engines but sometimes it does miss to crawl some of your pages. If you use XML Sitemap for your blog then the missing chances of crawling almost gets zero. So, it is better if you have a Sitemap for your blog. Follow the below mentioned steps to add Sitemap to your blog.

Steps:

1. Go to Sitemap Generator site to generate your blog's Sitemap.

2. Enter your blog's URL in the empty box and press on Generate Sitemap button.

3. It will then automatically generate your blog's sitemap like this-
Generated Sitemap

4. Copy the whole XML file and go to Blogger's settings page.

5. Click on Search preferences and edit the Custom robots.txt as shown below( paste your copied XML file in the box) and save it.

Custom robots.txt


6. You are done.
Rollover image effect means the image will change upon the sense of touch on it. If you give this effect to any image on your blog then the image will change on mouseover. You can give this kinds of effect anywhere in your blog. You can apply this to your social icons on your blog or in any image inside your blog post like this( place your mouse cursor on the image to see demo effect)-

Facebook rollover icon

Steps:

1. If you want to add this type of image effect on the sidebar of your blog then go the Layout page of your blog and add  a HTML/JavaScript gadget.

2. Paste the following codes in the gadget after editing the necessary portions. You can also resize your image according to your sweet will.
<a href="Your page/Target URL"><img src="URL OF THE FIRST IMAGE" onmouseover="this.src='URL OF THE SECOND IMAGE'" onmouseout="this.src='URL OF THE FIRST IMAGE'" width="200" height="200"/></a>

For example: 
<a href="https://web.facebook.com/techknowledgeblog"><img src="https://blogger.googleusercontent.com/img/b/R29vZ2xl/AVvXsEgaBnFEkmInM4mJ5nURmS7b6moKPa16i_d_HBpPTauorWu04n7nnxsWC6Aeb0ihAYk6mZ4V9yERRPaFWkRKXeEh2hQrh6cZTlEaF6c8BhOIUD6RIpzXftKg5Ig8a4JuQj_-aDi8LcwatSg/s1600/facebookLogo1.png" onmouseover="this.src='https://blogger.googleusercontent.com/img/b/R29vZ2xl/AVvXsEhzRNKAFU446JqfYOXhvwlObXJDdEC99953eX_vy7fRY2CT3bOaPk8xEtxAOLptd2q_bUKlWXXpxZ-EpCa8qUBUCW7wTuY6O9kZVmh1XV8BDGHpPWY-jtn-h5WKG03JI6LNl5zxuTWfOy0/s1600/facebookLogo2.png'" onmouseout="this.src='https://blogger.googleusercontent.com/img/b/R29vZ2xl/AVvXsEgaBnFEkmInM4mJ5nURmS7b6moKPa16i_d_HBpPTauorWu04n7nnxsWC6Aeb0ihAYk6mZ4V9yERRPaFWkRKXeEh2hQrh6cZTlEaF6c8BhOIUD6RIpzXftKg5Ig8a4JuQj_-aDi8LcwatSg/s1600/facebookLogo1.png'" width="200" height="200"/></a>

3. Save your gadget. You are done. 

Notice:
If you want to add this image effect inside your blog post then put the codes in the HTML section.


Add Multiple Widget on Blogger Header
If your template doesn't support you to add multiple widget on Blogger header then you can follow the steps to enable multiple widget support on Blogger header.


Port80
The way to open Port 80 in windows PC has been shown below. Follow the steps to open Port 80. 
Enable HTTPS in Blogger
Recently Google has rolled out first version of  HTTPS support for Blogspot. This is a security function which makes information of blog authors and visitors secure from getting stolen or tracked by bad actors. It also helps visitors to land on the correct website and aren't getting redirected to malicious website. There is a noticeable thing that is HTTPS support is only available for Blogspot domains like example.blogspot.com. So, if you are willing to enable HTTPS in your blog then follow the steps-

Steps:

1.a) At first go to your dashboard and select the blog in which you want to enable HTTPS. 

1.b) Then press on Settings.
Press on Settings

2. In the General settings page select Yes from HTTPS Settings option. You are done.
Press on Yes
 Add Social Media Icon in Blogger Sidebar
If you want to connect with people by using social media icons in your blog then this post might be helpful for you. There are lots of customized social media icons are available online. You can collect those icons for free. Upload the icons on Flickr or in some social media like this to collect your icon url. Now, you have to follow some few steps to add social media icons to your blogger sidebar which I have shown below.
                                                        Follow us on Facebook!Follow us on Twitter!Follow us on Youtube!Follow us on rss!

Steps:

1. At first go to your Blogger's Layout page.

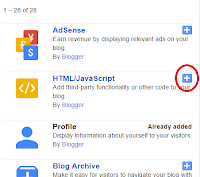
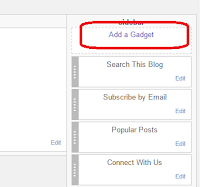
2. Click on Add a Gadget and add HTML/JavaScript gadget.

Add a GadgetHTML/JavaScript Gadget


3. Now paste the following codes inside that gadget-
<a href="YOUR SOCIAL SITE URL"><img alt="Follow us on Facebook!" height="72" src="YOUR SOCIAL ICON IMAGE LINK" width="72" /></a>

For example-
<a href="https://web.facebook.com/techknowledgeblog"><img alt="Follow us on Facebook!" src="https://blogger.googleusercontent.com/img/b/R29vZ2xl/AVvXsEhnvfVSkbNnlm2msWxx-hA_APMmfa0aUN3Psgv2w1hdRPrtLpAiKmRmeA3RIRIcRHGVm6FWzWU35qKzlkLQLpJAA2xTdzjv2OJNnl0rrgL4zjyPzxst6wpEwtYMQPKjCCWQrkdC5hFkQgw/s1600/facebook.png" width="72" height="72" /></a>

4. If you wish to keep icons side by side then place the codes side by side I mean paste your new code just after </a>. For example-
<a href="YOUR SOCIAL SITE URL"><img alt="Follow us on Facebook!" height="72" src="YOUR SOCIAL ICON IMAGE LINK" width="72" /></a><a href="YOUR SOCIAL SITE URL"><img alt="Follow us on Twitter!" height="72" src="YOUR SOCIAL ICON IMAGE LINK" width="72" /></a>

5. Now save the gadget and you are ready to show your icons.
Auto Shutdown PC
It is very obvious that sometimes we need to auto shutdown our pc. If you are looking for an easy solution to do this then follow my steps. I have shown here a very few steps to do it. This process won't take more than 2-3minutes. I think it will work on your computer.
Facebook Like Box

Follow a few simple steps to create Facebook like box for your blog.

Steps:

1. At first collect your Facebook page URL. Copy your Page link from the URL bar.

2. Visit this link to create your Facebook like box- https://developers.facebook.com/docs/plugins/page-plugin 

3. Paste your Facebook page link in the Facebook Page URL section, and edit Width and Height according to your demand.
Paste your Facebook page link


4. Press on the button 'Get Code'.

5. Copy codes from the upper box and go to the Edit HTML of your blog and paste codes right after the opening <body> tag.
Copy codes from the upper box


6. Copy codes from the bottom box and go to your Blog's Layout page and press on 'Add a Gadget'.
Copy codes from the bottom box
Add a Gadget


7. Add 'HTML/JavaScript' gadget.
Add HTML


8. Now paste the code inside that gadget and save it. You are done.
Past code and save